Tuesday, 23 September 2014

Smashbox Photo Finish Foundation Primer SPF 20 with Dermaxyl™ Complex


I received this from Beauty Bulletin in July as part of my second Product Review Club and few things could make me happier.

The Superficial

First impression: you need more than a pea-size for your whole face. Or maybe I just have a big face?

Turns out, a pea-sized amount (not mini-Astro-sized) is really ALL you need per application. But DON'T expect state-of-the-art SPF 20 sun-protection from that amount of product. Y'all know I'm the Sunscreen Drill Sergeant (SDS sounds like a disease), so do I really need to complete this sentence differently? Do I? DO I?

I used this every day for just over a week when I first received it, and (most importantly to me) I had no negative reactions. Two months down the line, still no negative reaction. I only whip it out for special occasions, though. Having a "semi-sensitive, reactive skin type" this is always my first concern.

This primer appears translucent and peachy, and I got excited that it may have a brightening effect (however slight), but it applies diaphanously. Smashbox Photo Finish Foundation Primer SPF 20 with Dermaxyl™ Complex is a semi-matte primer. It gives a very "soft" finish and is not mattifying to the point of looking dry, but not "glowy" enough to be considered "radiant". It is hydrating, but if you're specifically looking for hydration, perhaps you should try something else. Since Smashbox have a primer for everything (except your walls), you could try their Photo Finish Hydrating Foundation Primer, or you could address your hydration needs with skin care products.

I've used this on it's own and with makeup; there isn't a noticeable difference in the appearance of my skin (in the mirror) after application, but photos say otherwise - pores and fine lines are vaguely blurred and softened. When applying makeup, I only needed about half the amount of BB cream I usually apply, for more or less the same coverage. My makeup definitely lasted longer with less touch-ups needed. It is gentle and effective around the eye area as well as on lips. I applied this before MAC Brave Red lipstick, with no other lip product, and I got at least an hour extra out of it. I'll admit to eating a bit more carefully, but that's not unusual of me - I do it whenever I wear red lipstick. You know, that all-teeth eating style? Where it looks like you're avoiding touching the fork with any part of your mouth, due to the possibility of electrocution... Because forks are evil. Common knowledge, this.

I'm enjoying this product and have added it to my every day "essentials" makeup bag, where it'll happily stay. I look forward to trying the Smashbox Photo Finish More Than Primer Blemish Control Primer - it contains salicylic acid which is one of my favourite ingredient superstars and extremely beneficial for all skin types. Avoid if you're allergic to aspirin, though.

The Deep

WTF is Dermaxyl™ Complex?

**Dermaxyl™ Complex is an anti-aging complex formulated to repair damage related to skin aging. This makes sense since it's a blend of amino acids which help normalize skin cell function by stimulating cell-communication. It may repair skin damage related to aging by stimulation of collagen and hyaluronic acid production. This will also contribute to the strengthening of the skin's natural barrier function. Clinicare.com says, "Daily use of products formulated with Dermaxyl produce results similar to retinoic acid and retinol, and, very importantly, does so without the irritation these products and alpha hydroxy (fruit/glycolic) acid-based formulations often cause." You can read more about the clinical study results here.

Ingredients (as it appears on packaging):
Cyclopentasiloxane,
Homosalate
Polysilicone- 11
Dimethicone Crosspolymer
Ethylhexyl Salicylate
C12-15 Alkyl Benzoate
Butyl Methoxydibenzoylmethane
Tocopherol Acetate
Cola Acuminata (Kola) Seed Extract
Vitis Vinifera (Grape) Seed Extract
Carthamus Tinctorius (Safflower) Seed Oil
Polyglycerol-4 Isostearate
Cetyl PEG/PPG- 10/1 Dimethicone
Octyldodecyl Neopentanoate
Tribehenin
Ceramide 2
PEG-10 Rapeseed Sterol
Palmitoyl Oligopeptide**
Acetyl Hexapeptide-8
Phenyl Trimethicone
Water\Aqua\Eau
Silica
Laureth-12
Hexyl Laurate
VP/Hexadecene Copolymer
Triethoxycaprylylsilane
Caprylyl Glycol
Hexylene Glycol
Hydrogenated Polydecene
Phenoxyethanol
Potassium Sorbate
Iron Oxides (CI 77491)

You can also check out my video review for Beauty Bulletin, if you so wish:


Miss B

*prices are correct according to www.redsquare.co.za at the time of publishing

Monday, 7 July 2014

Clinique Anti-Blemish Solutions Clinical Clearing Gel

source

I received this product from Beauty Bulletin about 3 weeks ago and was super excited to be selected as part of the Clinique Anti-Blemish Solutions Clinical Clearing Gel Review Club. First time as a part of a BB Review Club. I've used Clinique skin care products before, and although there are very few that I like (The City Block Sheer Oil-Free Daily Face Protector SPF 25 can stay!), I'd totally spend a little extra on their makeup.

The texture is nice - light and easily absorbed, and the packaging is simple and "clean", but not ideal for preservation of the product. The bottle is a firm/hard plastic and unless you can squeeze some out and close it while holding that squeeze without letting more product out, air will get in, and render the product less effective over time. Common problem, that. 

I'm not sure if I'm more disappointed in this product or myself. When I got the news that I'd be receiving it, I Googled my ass off in search of ingredients. Think page 5 of Google search results...where English seemed scarce. No luck, so I had to wait until I had it in my hands. I was very excited about the inclusion of salicylic acid and a few other beneficial ingredients, but this is overshadowed by the use of alcohol and witch hazel which are known skin irritants. Alcohol makes up most of this product and it is very apparent upon opening the product. My heart sank when I saw that alcohol was the first ingredient. Sigh. But neither that nor the addition of witch hazel stopped me from putting it on my face. And I totally regret it.

These pics are not edited in any way, and I clearly haven't mastered all this selfie bs.

I had a mild breakout with one very noticeable blemish below my nose when I started using this. Although the most noticeable blemish was somewhat diminished the next day, I had more noticeable blemishes than before I started using the Clinique Anti-Blemish Solutions Clinical Clearing Gel, including that little monster on my cheek (top right pic). After using this on my entire face, twice a day, for 2 days with much discomfort, I tried using it as a spot treatment for the next 5 days, with no improvement. Using this product had senstitized my skin and I had to deal with breakouts, redness and flakiness. I stopped using the Clinique Anti-Blemish Solutions Clinical Clearing Gel after 7 days of use, and 5 days after that my skin was almost clear, except for that little bugger (top right on image). The mark is still visible, but I haven't been able to feel it since about 4 days after ceasing to use the Anti-Blemish gel.

Needless to say, I won't be recommending this product. I've had more success with Tea Tree oil. The Clinique Anti-Blemish Solutions Clinical Clearing Gel retails at R230 for 15ml, and R350 for 30ml.*


Ingredients (as it appears on packaging):
Alcohol Denat.
Water\Aqua\Eau
Acrylates/C10-30 Alkyl Acrylate Crosspolymer
Hamamelis Virginiana (Witch Hazel)
Salicylic Acid
Laminaria Saccharina Extract
Sea Whip Extract
Butylene Glycol
Benzalkonium Chloride

Miss B


Follow on Bloglovin

*prices are correct according to clinique.co.za at the time of publishing

Tuesday, 27 May 2014

#BeautyTipTuesday: #DabitDontDragit


source: polished.tv

Taking care of our lips may be one of the simplest things in our beauty routines. Applying lip products is habitual for most of us, whether it's in the form of a balm, stain, tint, lipstick or gloss. And it's so quick and easy to do, that it's seldom inconvenient. I do this as I'm locking the door, while I'm putting on my jacket, or sitting in the car waiting for the gate to open/close. Sometimes, I even apply it as I'm walking into wherever I need to be.

Although applying lip products has become second-nature to most, we're all lip-care sinners. The application of lipstick is so glamourous in ads, movies and music videos. I especially love the lipstick slow-mo. It's so seductive and beautiful. Except the part where SHE'S DOING IT WRONG! Okay, that's a tad dramatic.

#DabitDontDragit

Our lips are delicate and we need a little restraint. We should be patting and dabbing on our lip products, instead of dragging lip products carelessly across our beautiful faces. The stratum corneum that covers the lips is super thin, we have no sebaceous glands to lubricate our lips naturally, and water loss on the lips is a whopping 3-10 times higher than the rest of the body The natural colour of your lips is a result of the underlying blood-vessels, and (again) the super thin skin covering it, allowing the red and pink (and blue, in winter) tones to shine through. I think that's pretty cool, but I digress. We need to treat the lips with the same gentle care as we do our eye areas. You don't need much pressure applying good lip products. By dabbing instead of dragging, there's less "stress" and stretching on the very thin skin covering on your lips, and it's less likely to be chapped as a direct result of your application method. I've done this, it ain't cool. And neither was that lipstick.

YES, you can get the same, intense colour without dragging your lippies. Just keep dabbing, and use a lip brush. I do this with red lipstick. I dab it until it's as intense as I like it, and then I dab my lip brush in the same colour and fill the bits and pieces closest to my lip line. I also define the vermillion border with a lip brush or soft lip pencil and VOILA! Same-same. And obvs you can use your lipgloss applicator in the same way. I love the soft brush of Bourjois's Rose Exclusif Lipgloss and the sponge-tip applicator of Essence's XXXL Nudes lipgloss.

So dab-dab-dab, pat-pat-pat, dab-dab-dab. And dab some more.

#DabitDontDragit

Have you mastered applying lip products without dragging? Any tips and tricks?

Miss B

Follow on Bloglovin

Tuesday, 20 May 2014

#BeautyTipTuesday Post-wax lotion - Home care

If you're a regular reader, you'll know that I'm crazy in love with waxing. I did the waxing series almost two years ago and have updated it as I've learnt new things via research and experience. They're the most popular posts on my blog (see right). Thanks, pervs.

One thing I battle with is post-wax home care. There's only so much I can advise my clients, and there's always a chance they're not going to follow my advice. They may have a hot shower and use a heavily fragranced body lotion as soon as they get home, because of habit, routine and lack of suitable products.

It's best to use a fragrance-free, colourant-free, irritant-free, alcohol-free, soothing lotion on the waxed area. And it's hard to find such products. Trust me, I sat on the floor in clicks reading labels, in search of the perfect body lotion and best sunscreen. I nearly laid down in the middle of the parking lot afterwards, it was so depressing to leave with nothing. An after-wax lotion was also one of the last things I decided on, when starting The Wax Room. I focus on skin care when waxing, and it was hard to find a fragrance-free, alcohol-free post-wax lotion. I don't use a pre-wax spray or lotion for this reason: it all contains alcohol. And if no alcohol is present, it contains other skin-irritants like witch hazel, and then says it's "ultra-calming." *bangs head on keyboard* 

You could buy post-wax lotion. Some suppliers are open to the public (very few), but you could simply ask your therapist about options, or ask her to order the one s/he uses on you, if you've never had a negative reaction to it. You could also use an after-sun product. Whether it be a lotion, milk or gel, it's probably better than that perfumed body lotion you have. You know, the one that came in a set with your fragrance. The MATCHING one. Do people still do this kind of layering of perfume? Seriously, I'm curious. Many after-sun's are great in that they have a light texture and are packed with soothing and moisturizing ingredients.  Avoid any after-sun products that are heavily fragranced, though. My favourite anti-irritant, soothing ingredients are aloe vera, allantoin and chamomile. Many health, natural and/or homeopathic stores have aloe vera gel and chamomile creams that could be perfect. Again, be mindful of the ingredients and fragrance components. All fragrance is bad for skin. Even natural fragrance.

What products do you use after waxing? Have you ever been advised to use something specific?


  Miss B

Follow on Bloglovin

Wednesday, 14 May 2014

'Sup homies

Hey hey hey

It's been a while...

I've been working on so many things at once, and every time I sat down with the intention to write here, I was distracted by other pressing issues. Prioritizing is hard work sometimes, yo.

So much for #BeautyTipTuesday...

Let's pick it up from next week. I've got so many "drafts" with tips to share, and I have doubts about scheduling, but will give that another chance. And check my timezone settings this time. *facepalm* Adoy.

As always, your comments, questions and suggestions are welcome. Hit me up.

Miss B

Follow on Bloglovin

Dark Circles: Think about it...

"Hundreds of eye creams are being sold, all making claims they get rid of dark circles among other problems around the eye area, and yet we have never received feedback from anyone saying their dark circles went away from the products they were using. Even the cosmetics companies don’t believe their own claims about the eye creams they sell or they wouldn’t launch new ones year after year after year. If the last ones worked as claimed, what are the new ones for?" - Paula Begoun. 

Makes sense, right?

Miss B

Follow on Bloglovin

Tuesday, 18 March 2014

#BeautyTipTuesday: Eye Makeup

Do your eye makeup first.

Yeah, son, I don't waste time.

Prime your face, and then concentrate on your eye makeup only. Apply foundation and concealer to your eye area, and then continue as you would with your eyeshadow, liner, mascara and/or whatever other eye makeup products you use. 

When you do your eye makeup first, it's easier to clean up any fallen shadow, smudged lines and mistakes you've made. Er, mistake you've made with makeup, obvs. Sure, you could pat powder under your eyes, but I find that often the powder sticks and I end up with more powder than I wanted. I don't wear powder under my eyes, usually, so even a little is too much for me. I'm still on a mission to find the perfect powder that doesn't crease and cake and make my skin look drier and more tired than it is. Urgh. 

When I apply mascara to the lower lashes, especially when I'm in a rush, I often touch the skin beneath the lashes. If I had patted some powder onto that area, after foundation and concealer to the entire face, I'd most likely smudge the mascara when dusting the excess powder away. If this happens before I apply foundation and concealer to the rest of my face, it's much simpler to just swoop in with my foundation brush. The same applies if you're using eyeshadow to line the lower lids. You may have applied more to one eye than the other and when it looks uneven, it's harder to correct once all your other makeup is applied. You'll have to go in with your foundation, and then it may not match the rest of the already-concealed and set area, and then you'll have to re-do that. 

Another reason I find this method great is that I spend the most time on my eyes, and I need a steady hand and lots of light. Once that's done, and I've run out of time, I can do everything else in the car. You don't need a super steady hand or perfect precision to spread/blend/apply foundation, powder, bronzer, blush and even highligher. Even if you don't have time for all that, your eyes will be perfect and all you'll need is some lip colour, if that. 

Eyes on the prize.

Miss B

Follow on Bloglovin

Tuesday, 4 March 2014

#BeautyTipTuesday: Flyaways

Flyaways. Pssh. I honestly don't know a life without these little buggers. I've had them FOREVER! "Them" as if they're beings. For the most part they don't bother me because I hardly wear such sophisticated and perfect updos that require flyaways be done away with. But sometimes, they drive me nuts, and I wish them away.

I took this a while back when I was checking the frame before recording a beautorial for rubybox...in my pyjamas, my outfit of choice. Also, I had just moisturized and LOVE the finish of Environ's Original Mild Night. It's beautifully soft and semi-matte, as you can see. 
You can see some of the flyaways in the pic above, but it's fairly tamed compared to when I pull my hair all back, and look like I have devil horns made of hair, with a killer Widow's peak.

The best way to tame them, I've found, is to use a disposable mascara brush with some hairspray, as I've done in the sock bun tutorial video. You can see plenty flyaways in the vid, too, that I failed to tame. You don't want flyaways with a sock bun.


I sprayed directly onto my hair and then went over it with a disposable mascara brush, but that takes forever, and not ALL my hair needed/needs to be tamed with a mascara brush, so now I spray directly onto the mascara brush and go over only the flyaways. The best way is to go over the flyaways softly as to not cause a "ripple" or bump where you stop with the brush, possibly upsetting your entire 'do, or creating unevenness. There's no need to press down on your hair with the mascara brush as if you're trying to brush out knots. You can go over the area with your fingers or hand immediately after using the mascara brush, but depending on the hairspray, I try to avoid it. Some strong hold hairsprays can make the hair stick together slightly, like when you use gel, and I don't like that. I don't like gel, and I don't like the sticky, flat, dull look it usually gives.

The Marc Anthony Oil of Morocco Argan Oil Volume Shine Hairspray is particularly good if shine is super important to you. It's very light and has a glossy finish. The staying power (hold), however, is debatable and is more flexible than it is strong. The Kerastase Laque Couture provides more of a hold, by comparison.

Some people use a toothbrush to tame flyaways, but some toothbrushes have rubbery bits in them, and that could pull on your hair, and I have enough broken hair, thanks. Also, I use toothbrushes to clean around taps and plug-holes and drains, and I'd HATE to confuse which toothbrush was used for what and end up using a toothbrush in my hair that was once used to scrub a drain. If you prefer a toothbrush, and can afford to buy an extra one just for your hair, or use an old one (gross), that's all on you, son. Disposable mascara brushes are a great tool to have, and they'll fit perfectly into your sleek clutch. You could also keep mascara brushes from the mascara that you purchase, just be sure to clean it thoroughly when it's time to toss the tube/bottle.

Have any tips on taming flyaways? Share below in the comments. :-)


Miss B


Follow on Bloglovin

Tuesday, 25 February 2014

#BeautyTipTuesday: Nose Peeling - Prevent and Heal

I suffer from hay fever, sinusitis, a handful of other allergies and I currently have a cold. Sniff. On a great day, I don't touch my nose at all except when I'm doing my usual beauty routine. On a bad day, I go through and entire box of tissues and/or a toilet roll and my *sneeze* sentences *sneeze* go something *sneeze* like *sneeze* this.*sneeze* *tears* Damn, I knew I shouldn't have thrown away all those rolled up tissues before I took a picture for you guys. If I put it all into a pillow case, I'm sure my Cocker Spaniel would have a comfortable pillow-bed.

This fading cold doesn't help much. Because of all the nose-blowing and nose-rubbing, my skin goes through a lot of friction and irritation. And boy does she express herself and let me have it. The skin around my nose dries out and peels, I breakout in the perioral area, my lips become dry and sometimes, my skin even starts flaking from my nose to my chin. This makes any skin care product application uncomfortable and makeup can emphasize all that is wrong, and sometimes burns.

There is a simple solution, really: Apply a layer of balmy moisturizer onto the skin around your nose BEFORE blowing it. This way, there's a layer between the tissue/toilet paper and your skin, and there's less friction and direct irritation and rubbing of your skin. You can use any petroleum jelly-based product, or a rich, emollient cream. Here's the deal, though, it can't contain alcohol and/or fragrance. These are two known skin irritants (and we should cut it out of our routines, completely, in my opinion). It doesn't matter how little of it there is in the product. Your skin's already going through a lot, why put it under additional stress and prolong the healing process, especially if the skin's already dry and peeling?

I use (and LOVE):
1) Eucerin's Aquaphor Soothing Skin Balm

source: longevitylive.com
It smells like nothing, and feels pretty much like petroleum-jelly. It enhances your skin's natural healing process and forms a protective barrier. It contains 41% petrolatum (active ingredient), mineral oil, panthenol, glycerin and a few other ingredients. Nothing "special", right? Back to basics, yo. I bought this specifically for my nose, but now use it on my lips, cuticles, hands and feet. And have gladly shared it with The Man, for his feet. I remember to use this before blowing most of the time, but when I forget and my skin's already peeling, I apply it to the dry skin anyway, and I've seen a great improvement in the healing time and appearance of my skin. It also makes a big difference when applied to peeling skin before makeup application, but remember to rub it (or press it) in gently before makeup application.

2) Balm Balm Face Balm, fragrance-free

source: balmbalm.com Currently available on rubybox for R149,95*
Balm Balm's Fragrance-free Face Balm contains shea butter, sunflower oil, beeswax, calendula oil and jojoba oil. It's super moisturizing. I only use this when my nose is blocked and I can't smell a thing. I don't know what it is, but I really battle with the smell. It reminds me of the smell of old, used oil that my grandmother used to pour into a bottle from the pot because she didn't want to throw it down the kitchen sink drain. I just can't deal. I feel like I'm Jim Carrey in Liar Liar doing "The Claw" on myself when I apply this when my nose is not blocked. Other than that, it's good, and a great option for those who don't like that "vaseline" texture. Although this is a balm, it melts onto your skin, and feels pretty much like an oil-based serum. This kind of texture is better for pre-makeup-application use once the skin is already peeling. It melts onto the skin and "glues" down the dry flaky bits so it looks like nothing was ever wrong. Remember to conceal the redness, though. And like Eucerin's Aquaphor, this balm can be used a multitude of ways. I actually prefer this one for my cuticles.

You could also use petroleum jelly if you want. PLEASE DO NOT USE Vicks VapoRub, or any other other menthol-y products (incl. Zambuk and Cuticura). It will burn, and all that camphor, menthol and eucalyptus is not great for your skin: known skin irritants. Camphor can cause dermatitis with long-term use. All these irritants are counter-irritants, producing one kind of inflammation to replace another and impairs your skin's healing response, which is what you want at it's best when your skin's peeling, or recovering from any other injury. Remember that just because you're not feeling or seeing the irritation, doesn't mean it isn't happening and damaging your skin over time. By all means, get some eucalyptus/peppermint oil and use it for aromatherapy purposes and to help clear a stuffy nose, just don't apply it directly to the skin.

What do you use when the skin around your nose is peeling and sensitive?

Miss B
*At the time of publishing

Follow on Bloglovin

Friday, 21 February 2014

Sock Bun Tutorial


Hey hey hey!

Happy Friday. :-)

I made another hair tutorial for rubybox. Yay! This time it's a sock bun...with a twist. The lazy-girl-guide, even. Not because I'm super lazy, but because after trying to do the traditional sock bun with all the wrapping and rolling for a few days (and still didn't get it right), the hair breakage became too much for me to handle, and my hair was everywhere. EVERYWHERE! My hair was as visible as my dogs' hair. I have 3 dogs, one of which is a Golden Retriever.


In the video I used the Marc Anthony Oil of Morocco Argan Oil Volume Shine Hairspray and rubybox Hair Pearl & Satin Alice Band Duo as well as their Flower Alice Band. The one I have is more like a head band (elasticated), not that I used it that way, anyway.

Products I used on my hair:

Kerastase Dermo-Calm Shampoo
Kerastase Cristalliste Conditioner
ghd Heat Protect Spray
PARLUX Eco-Friendly 3800 Ceramic Ionic hair dryer
Some extra-large barrel brush my mom gave me. She doesn't remember the details.
Kerastase Elixir Ultime


Hope you have a great weekend. Try this easy-peasy sock bun and let me know how much you love it or hate it. I love pics, too. Of your hair and sock buns ONLY, please.


Miss B

Follow on Bloglovin

Tuesday, 18 February 2014

#BeautyTipTuesday: Sunscreen

If you don't know by now, I am in love with sunscreen. Not like that, eeuw! I am a sunscreen enthusiast. And proudly so.

I am all for sun protection, and I honestly don't understand why more people aren't. Well, I have an idea: laziness. So you have enough time to make a cup of coffee in the morning and put on your makeup, maybe do your hair, but you can't spare 5 minutes (even less) to add sunscreen into your daily routine? I mean DAILY, not just Monday to Friday. I've made a few last minute decisions to leave the house and even then, I'd rather protect myself from harmful UV radiation than apply makeup. And no, makeup with SPF is not enough. I apply sunscreen every day, at least to exposed skin, but mostly I apply it to my entire body. Including hands and feet. And ears. And many of my hair products have UV filters in them, too. 

A few clients have "confessed" that they go to the store with the intention to buy sunscreen, but once they arrive, they get overwhelmed with all the options, promises, SPF numbers and price options. It is totally understandable, the same thing happened to me the other day. My sunscreen is currently less than half (freak out sesh. Kidding.) and I went in with a list of sunscreen ingredients to look for, and then realized that every single sunscreen available at the Clicks closest to where I stay either had alcohol and/or fragrance in it. Some of which had it in the top 5 ingredients. No, thanks. Pass. It's frustrating, as alcohol and fragrance (even "natural" fragrance) are known to be irritating to the skin. And there's no way your skin can function at it's best when it's irritated. I'm still searching, though, and I'll be happy to share if I find one that's got all the good stuff with none, or much less, of the bad stuff. :-)

In the meantime, here's a list of sunscreen ingredients to take note of, and refer to, when next you go shopping:
  • titanium dioxide
  • zinc oxide
  • butyl methoxydibenzoylmethane a.k.a avobenzone and Parsol 1789
  • Mexoryl SX a.k.a ecamsule. Technical name: terephthalylidine dicamphor sulfonic acid. Great facial nerve exercise.
  • Tinosorb
These ingredients should be listed as "active ingredients". Not many products in SA list the active ingredients separately from the rest, so it would be good if one of the above is listed in the first few ingredients. It would also be SUPER if you could find a formulation that is alcohol- and fragrance-free (and if you do, please share in the comments below). Cetyl alcohol, stearyl alcohol and other fatty alcohols are not bad for your skin: they are emollient and can benefit dry skin. If fragrance (may also be listed as "parfum" or "pthalates")  is listed in the last three ingredients, I wouldn't worry too much, if the rest of the formulation is great and the active sunscreen ingredients are present.

Waste no more time procrastinating this protective measure, y'all. It's one of the simplest things you can do to protect yourself from the sun's damaging UV rays. 

And don't skimp on the sunscreen. Seriously. Pretend it's your favourite drink and you just want it all over you. Wow, that's not a great example. You get the picture. 


Miss B

Follow on Bloglovin

Tuesday, 11 February 2014

#BeautyTipTuesday: Contouring/Shading

Source: kimkardashian.celebuzz.com

Contouring is very popular, and a daily must for some, and I see it often. I don't want to SEE it, though. I wish I didn't, but alas. The point of contouring is to give parts of the face more depth, "fake cheekbones" (we all have cheekbones, just to be clear) and make the face, or part thereof, appear slimmer. It's all well and good until someone uses the wrong shade and doesn't blend enough.


The most popular product used to contour is, no doubt, bronzer. Bronzers are nice, and often it makes the world of difference to clients when I use it on them. The thing with bronzer, though, is that most of them contain golden, orange, yellow and bronze (duh) tones; when layered incorrectly this looks all kinds of wrong, most notably muddy and dirty. "Vuil" is more accurate.

It's always better to start of lightly, and then layer. I know many people advise on using a shade that's about 2 shades darker than your complexion, but I've used shades way darker than my complexion (and the complexions of clients), I'm just very light-handed. Good tools help, too.

The image of Kim K, above, is a great guide in where to contour. But you should also check out Maskcara's guides to highlighting and contouring specifically for your face shape. She's super awesome!

Another GREAT tip I've come to learn, is to use a grey-toned powder for contouring. Think about it: you're trying to create "shadows" on your face, especially for the cheek contour. Have you ever seen a shadow that's orange-y? I haven't. For those who prefer contouring with liquid products, it's harder to find grey-toned liquid products, because not many people (if any) have grey toned skin (or maybe I just haven't come across many people with natural grey tones in their skin), but you can use your regular liquid contouring products, and go lightly over it with a grey-toned powder product for added definition and staying power.

And where do you find these grey-toned products?

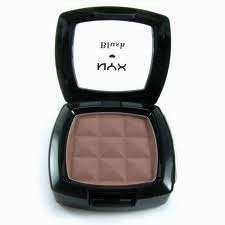
I love NYX Powder Blush in Taupe (matte). Available in Clicks stores.

source: makeupgeek.com

Truth is, you don't HAVE TO use bronzing powder to contour, you could use any matte or semi-matte powder product whether it be a blush, eyeshadow, powder foundation or a finishing powder. Always remember to be light-handed and layer. And then blend x100. And then blend once more.

And maybe once more before you leave the house. ;-)

Do you have any tips when it comes to contouring? Share in the comments. :-)

  Miss B

Follow on Bloglovin

P.s. I am not saying you should use grey eyeshadow to contour your face, but if you can find a grey-toned product, like the NYX blush, it would make a difference to the overall effect and result. Think "dull brown" shade. There's also a Yardley blush with grey-tones I've seen in Clicks a couple of times, but I don't know the exact name. I'll check it out and update this post. :-)

Wednesday, 5 February 2014

#BeautyTipTuesday: Oops, I squeezed out too much product...

...brought to you on a Wednesday because my laptop loves me sooooo much.

Sometimes we're in a hurry, and you know how it goes: you get toothpaste on your cleavage and in your hair, you wash your hands and end up with water splashed on your clothes in your pelvic area, you put foundation in your hair and your hair serum on your face, you squeeze out waaayyyy more product than you need. Of course, you don't have to be in a rush for these things to happen, as I have proven to myself almost daily.

My hands are sometimes stronger than I realize and I end up squeezing/pumping out too much product and then I swear at myself and let out a few heavy sighs. Even my dogs have picked up on this, and they do it before I even get the chance. Kids. Smh. Well, since you can't put it back as that will compromise the hygiene of the product, as well as increase and promote oxidation, we have to find ways of using it, right? It doesn't have to be the end of your product-economy-world. Here's what you can do with "extras":

1. Cleanser: If it's good enough for your face, it's good enough for the rest of your body.

2. Eye product: Apply the excess to any potential perioral lines (around your lips) and nasolabial folds (from the "outside" of your nostrils to the outer corner of your lips). You can also apply it to your cuticles, especially if you're using a richer, creamier eye product.

3. Moisturizer: Your facial care routine should extend to your neck and decollete, but if you don't already do that, any extra moisturizer should definitely go there. And if you still have left, your boobs and shoulders can get some lovin', too. In that order. Or not.

4. Sunscreen: No such thing. Put it everywhere. More! A little more than that. EVERYWHERE!

5. Hand cream: Elbows, knees, feet. It hardly ever happens, but when I squeeze out too much hand cream, my elbows do a happy dance. And can your heels ever get enough cream? C'mooon.


What do you do when you squeeze out too much product? Have any other tips and tricks?


Miss B


Follow on Bloglovin

Tuesday, 28 January 2014

#BeautyTipTuesday: Skip the Steam

image source: cygstarz.hubpages.com

Along with many others, I thought steaming was great for skin. Turns out, not so much.

The reasons I studied about why steaming was good for skin made a lot of sense to me at the time: softens surface debri making it easier to remove, opens pores for better product penetration, prepares the skin for the next step of a facial routine and is essential for products that are activated by heat and moisture. Sigh. Firstly, pores aren't doors: you can't open and close them as you wish with hot or cold water. Secondly, a good water-soluble cleanser can remove surface debri just fine. Product penetration is another post all on it's own. The only products that are activated by heat and/or moisture, that I can think of right now anyway, are some enzyme exfoliants and perhaps a mask. And I can think of less harsh ways to get both heat and moisture. Wet fingertips, anyone?

Steam is irritating to the skin, and can cause or worsen redness and result in inflammation. The heat can cause major discomfort, not to mention burns if used incorrectly. It can also cause broken capillaries that will appear similar to Telangiectasia (dilated blood vessels close to the surface of the skin).

Telangiectasia. Image source: doctorv.ca

 I've never seen telangiectasia this pronounced (or on the top of the nose area) on a client. It's more commonly found at the sides of the nose: supra alar crease, nostril and alarfacial groove. Image source: doctorv.ca

Steam CAN'T add moisture to your skin. You can't add moisture to your skin by soaking it in water. This breaks down the intercellular matrix which keeps skin cells bonded and functioning, creating a natural barrier. And we know that barrier function is one of the most important functions of the skin as it provides protection against moisture loss, bacteria/microbial invasion, irritation, inflammation and discomfort (among others), while supporting healing due to injury. The skin is such a wonderful organ. Steaming your face disturbs the intercellular matrix, which may result in dry skin because there is no longer protection against moisture loss.

Next time you go for a facial, give the steam a skip and ask the therapist why she uses it (out of curiosity). Yes, steam has been shown to be relaxing, but are you going for a facial for the sole purpose of relaxing? Heard of massage?

Remember: steam doesn't penetrate and cleanse your pores, and it defs doesn't add moisture.

Miss B

P.s. You know how after steaming, your face is wet? Your skin was obvs crying. Because steam is a meanie.

Follow on Bloglovin

.

Friday, 24 January 2014

My Beauty Battle: A Purge Sesh. Kinda.

I've been doing lots of research over the past few weeks and I've been having some difficulty with my findings, not because they're hard to understand, because I was disappointed. I've always had an intense desire to understand how and why things work, rather than just assuming and parrot-learning what is told to me by product trainers, managers, lecturers, learning manuals and some textbooks. This was seen as a weakness when I worked in salons/spas because product sales are important, and I refused to sell anything I didn't understand or believe in. I've made my target ONCE, and that was because there was a mistake in my contract regarding the formula/amount of what said target was. I've never earned commission: it's often worked out in relation to the target. However, I had a high number of return/regular clients, and I've never sold them anything I didn't believe they needed. I don't hate product houses, I obviously don't hate the cosmetics industry, but I strongly dislike purposefully misleading information regarding our skin care "needs". I also strongly dislike it when brands/product houses don't share ingredient information, which will hopefully be sorted out by the CPA over the next few years. The thing that struck me the most, though, is that some product trainers believed so wholeheartedly in the brand they represent (nothing wrong) that they hardly
(or never) question it. (Something wrong.) I once asked a trainer a question about the ingredients, order of ingredients and percentage of ingredients in a product, and she told me that it didn't matter because the product worked. In hindsight (and this is an assumption), she probably got trained just as she was training us, sharing her notes that she had taken during her training, without question. At first I felt a little stupid about it: how could I not understand how it works, how could I not understand how those ingredients do what they do, in that combination. But I soon realized, "Hey, trainers are there for a reason: to provide training and adequate information for me to be able to understand and, therefore, use products correctly and explain them correctly to the client, should they be interested to know more about it." Out of the nine brands I'm qualified to work with, 2 trainers have welcomed my questions. To give you an idea. Scary, huh?

I've known (since my first year of studies) that the cosmetics industry can be contradictory and divergent. This was especially apparent during product training. One brand saying "x is the best thing you can use for y skin type" and another brand saying "x is possibly the worst thing you can do for y skin type, it's much better to use products with c and d.I'm sure there are similar contradictions in any given industry. And I can only imagine the confusion and frustration consumers go through. It's one of the reasons why I value my education so much, and am ever grateful for it. I feel that because I have knowledge about the skin's structure and function, and some basic cosmetic science under my belt, I may ask 'better' questions in product training than someone who has no such background. Unfortunately, there are cosmetic brands that don't require one to have a skin care qualification before hiring, and then offer basic product and sales training to, well, sell their products. I obviously have a love-hate relationship with "sales". I don't have anything against the assistants in stores who don't have a skin care background. They help make product recommendations and sell us stuff. Not always the correct stuff, or the best stuff for our skin, unfortunately. Some of them love their jobs and the industry and are so passionate about their work. Many a time, I've had to ask them tons of questions about ingredients. Mostly because they look at me funny when I stand there with a list and read every box/bottle, in order to find out what the hell's in there, because it wasn't available online. So annoying. And they take turns asking if they can help me with something, until they've all had a go and then they stand behind their counters and try not to let me catch them staring. And some of them are so awesome that when they don't know or they can't answer me, they go behind their counters and whip out their training manuals in an effort to help me get more info. I appreciate and respect that a helluva lot more than having someone tell me, "Oh, don't worry, it's dermatologist tested and hypoallergenic," in response to me asking what's in it. True story.

I had a very glamourous idea about the industry, to be honest, but then I learnt that it's mostly glamourous from the exterior (the client experience), and I fell in love with it anyway because it was SO MUCH MORE than I had imagined. I became infatuated with science and chemistry (which only gave me endless nightmares, anxiety attacks and even panic attacks in matric), cosmetic science, anatomy and physiology, dermatology, and then some. I became excited about having the opportunity to make people feel better about themselves. It gave me great joy to share information with people about their skin, making it easier for them to understand and take care of. I still find this utterly exhilarating, because there's so much that is misunderstood and confusing. And there are tons of skin care"facts" with no scientific evidence to back it up. Yes, I know, there are also lots of things with opposing scientific evidence. It's mind-boggling how we pick a side in those situations.

There are things that made perfect sense to me a couple of years ago, regarding skin care and cosmetics, that I no longer feel the same about. Like steamers (which I'll get into on BeautyTipTuesday). At first I felt cheated: "How could they not teach us this? Why hasn't someone explained this to me before?" Now, I just realize that they may not have known any better, either. Then I felt bad: "I've been doing this for years. I've been recommending this and advising people this for years." After feeling bad and borderline hating myself for a couple of days... I know that at the time I did what I thought was the best possible thing, I gave the best advice I could possibly have given at that time.

I'm currently in the process of going through all my consultations and correcting any advice I no longer deem the best or most appropriate for the client's concerns/skin type/skin condition. It's hard work, exhausting even, but I know it's the right thing, and I've found it humbling. So so humbling. I have (and have had) the best clientele, and I feel very privileged and grateful to have worked with them and to have touched their skin. Not in a shady way, obvs. :-)


Miss B


Follow on Bloglovin

Tuesday, 21 January 2014

#BeautyTipTuesday: Minimize Hair in the Shower Drain

I wanted to say this is a hair tip, but "hygiene tip" would probably be more accurate.

I have long hair, so finding at least one strand of my hair in every room is highly possible. Multiply that by a hundred (or couple of hundred) and you basically have an idea of what my shower looks like after I wash my hair. Well, what my shower looked like years ago, especially during stressful times. Past tense. And although I love cleaning, I'm so not a drain-cleaning kinda gal. Sure, I'd pull my hair out of the drain, and then cut all my nails and scrub it with a nail brush because, depending how long it's been there, you get other bits of gross stuff, too: dust, soap, crap. Eeuw.

Everyone's hair will reach the end of it's life cycle and it will come out a couple of times in our lives, but I think I've got this shower-drain business waxed.

How to minimize the amount of hair in the shower drain:
(This also applies to head hair left on your body, between your butt cheeks and between your toes when you're done washing...)

1) Brush/comb your hair BEFORE you wash it. By doing this, you're brushing out the "loose" hairs that have already detached from your papilla which supplies its nourishment. These hairs may have come out while washing/rinsing your hair. And please, clean your brushes/combs regularly.

2) When you wash your hair, do so from root to tip and when you get to the ends, grab all the unattached hairs that usually hang from the ends. Bundle 'em up and put them aside in the shower, or throw them out of the shower. Whatever works for you. I usually twirl it around my index finger and put it in the corner of the shower where the door opens. Mainly so that I don't forget to take it out, which sometimes happens anyway. Sorry, Man Person.

3) Same applies for rinsing and conditioner application, even if you apply your conditioner from mid-length. As well as for that additional rinse you do at the end before getting out of the shower. I see you.

4) When you squeeze out the water from your hair before getting out or towel-drying, DO NOT wring your hair. This can cause breakage, and who wants that? Don't pull it too hard, either. Just do that "sexy hair washing" motion that people do on ads and in the movies. Go from your forehead/hairline, as if you're gathering your hair to tie a ponytail. And squeeze your hair out in sections as you move down your "ponytail". And when you get to the ends, grab the unattached hair before it falls into the shower, and ends up in the drain.

5) Check the shower floor. It's so much better picking up hairs on the floor than digging in the drain. It's possible that one or a few hairs may have escaped you, so look down for a second and pick it up.

6) So a few hairs ended up in the drain cover/screen/strainer thingy (what is that thing called?)... It's not as much as it could've been. Take it out if you have no issues. If you're squeamish, use a tissue or toilet paper. I'll admit to have using a toothpick to lift the hairs out of the drain and then either put it in the bin or flush it down the toilet.

7) Remember to remove it from the shower, or the shower mat, or wherever you decided to put it; especially if you share a home/bathroom with others.

It sounds like a lot of effort, but if takes less than a minute in total, versus being on your hands and knees scratching in the drain. Ain't nobody got the time, surn. If you weren't clearing your hair from the shower/drain before, you'll need to clean it first. Starting to twirl and bundle up your hair now is not going to clear the crap in the drain from the last year. You may even need some drain cleaner, but you should probably get advice about that from someone else. I will not be held responsible for inappropriate drain cleaning fluids ruining your pipes and water disposal system, sorry. I don't know much about this, I have a pair of gloves, a bucket and a reasonable retching reflex on most days. I kick it old school. And I love the word 'retching'. Retching. Retch retch retch. Retch for the stars. Haha. Gross. Sorry.

Do you have any tips and tricks on how to minimize the amount of hair going into the shower drain? Please feel free to share in the comments section.


Miss B


Follow on Bloglovin

Wednesday, 15 January 2014

#BeautyTipTuesday: Makeup Removal

I have to apologize about Beauty Tip Tuesday being on Wednesday. Whatthefructose. I had never scheduled a post before, and I scheduled this one and then....nothing. Urgh. Whaddupwiddat.

Today's (Yesterday's) Beauty Tip is about makeup removal.

A good, water-soluble cleanser should remove basic makeup, so why not try cleansing your face first, and if you need to, use a makeup remover on cotton pads afterwards. Obviously, if you wear lots of makeup, and waterproof products at that, you'll need a little help from a fragrance- and colourant-free makeup remover.

I haven't used makeup remover in a long time. I usually just cleanse, and if needs be I do a double cleanse, and then gently "dry" my face with a damp face cloth. I use a white, or very light cloth, for this so that I can see if there are any traces of makeup left, and then make sure it's garwn before slamming into my bed like a dead weight.

Your makeup remover shouldn't have fragrance and colouring agents, as these may likely irritate your skin, and may require additional cleansing to remove. Sounds like too much work for me, y'all. So dampen your face and then gently, but thoroughly, cleanse your skin in quick massage-like movements. Remember to get into that hairline, go right up until your ears, and up your neck (not down your neck, you guys, you work UP your neck). Yes, over your eyes, too. Your cleanser should be gentle enough to use over your eyes. I just heard one of my lecturers tell us "Do you know how many microorganisms live in your brows and lashes?" in my head. Obvs. 

By using your cleanser first (if you even need to use anything after) you minimize that horrible pulling and tugging and dragging motion you do with cotton pads and makeup removal wipes. You need to be far more gentle with your skin, kids. And guess what pulling and dragging and tugging on your skin does? It weakens the elastin fibres, and we know what that means... an increased risk of premature sagging. So be gentle when you cleanse, and be gentle when you remove any remnants of makeup with cotton pads and/or wipes. Don't use your strong hand for this one. ;-)


Miss B


Follow on Bloglovin

Wednesday, 8 January 2014

Bourjois Rose Exclusif Lipgloss

Bourjois Rose Exclusif Lipgloss, R99,95 on rubybox
This. Is. My. FAVOURITE! Lip product at the moment. Lip balm is the only other thing I've been wearing on my lips since receiving this from rubybox in November, along with the Bourjois Smoky Eyes Trio in Rose Vintage and the Bourjois Khol & Contour Eyepencil in Brun Design. It's just right. Every time.

Self-adjusting products are popular, and it's totally understandable why; with different undertones, complexions, "correction" requirements and the need for minimal guesswork when purchasing makeup. While walking around in a department store one day, running out of testing space on my arms (I'm sure you're familiar with this) looking for the perfect shade of blush, I came across a self-adjusting gel formula and was blown away, as I didn't expect to find it in SA, at the time. We have access to many SUPER brands (not enough, though) but we don't often get the WHOLE collection of products. Within the next month or two, there were self-adjusting products errrwhere. I like the idea, but very few of them work to my satisfaction. I've tried a few on my hands and arms in stores that just didn't adjust to suit MY skin colour or a natural-looking shade of pink. I'm still like a kid about it, though, I get all excited when clear gels and white creams start turning into shades of a good cup of tea with milk, or into strawberry Fizzer shades. Omg, you guys, I have a serious Fizzer addiction. I'm totally going off sugar once I finish this bag of Fizzers, I swear. My body has spoken! But it tastes SO GOOD!

Jeez, can you, like, get back to the product at hand, here, Crazy.

2 3 4 7 Fizzers later.

Bourjois Rose Exclusif Lipgloss contains pigments that adjust to the pH of your lips, delivering a somewhat exclusive rose-pink shade. We could all use this and have different shades of rose-pink lips. I tried it on my cheeks, too, thinking it would be all matchy-matchy with my lips. It wasn't. Clearly differing pH levels, then.

Bourjois Rose Exclusif Lipgloss. Love the brush. It's like a nail polish brush. I want nail polish with a brush like that. 

It goes on as a clear, slightly sticky gloss, that is also self-leveling, I may add. The colour develops within seconds... and sometimes keeps developing. It doesn't say that the colour intensity is layer-dependent, but I've noticed that the more I apply, the darker/brighter it seems. I don't mind dark/bright pinks, but if you're looking for a natural, hint of pink, you either need to use very little and spread it with a clean lip brush or your finger tips, or you need to move on to something else.

I thought I could outsmart this product by "lining" my lips with it a few minutes before filling in it to create a two-tone effect. It looked like those really old-school sitcoms and music videos where they lined their lips and then added clear gloss. Just no.  Minutes later, I applied it again, going over the entire area of my lips. It was SO COOL. Two-toned lips with minimal thought or effort. Until minutes later, it all developed into a uniform colour. Short-lived genius. I guess you could also look at that as foolproof. Right?

It has vitamins C and E, which I love, but it certainly doesn't provide 8 hour moisture as it says it does. It's not a drying gloss at all, as I've come to expect of sticky glosses, but I didn't find it particularly moisturizing. Also, the glossiness will wear off, especially if you're going to eat, drink, talk a lot or kiss someone. The colour, however, outlives the gloss. So even hours after your pout is no longer bouncing the light into the eyes of a cute person, it will still look like you just ate a  pink bompie. still look nicely tinted/stained, and more natural. Two thumbs up for colour longevity.

I've only tried this over a lipstick once, and I didn't particularly love the result, so I'll keep using this clean, or over lip balm. You really don't need anything else with this lip product, and I'll be more than happy to purchase this with my own paper cash money once I finish this one. It's now a staple. Also, pretty convenient if you're going out and want to use a clutch or a small bag with minimal space. You know, the ones that can only carry your phone, money and a couple of tissues. Just halve the amount of tissues, and add your Bourjois Rose Exclusif. :-D


Miss B


Follow on Bloglovin

Tuesday, 7 January 2014

#BeautyTipTuesday: Nail care

Helloooooooo!

Happy New Year! :-)

I'm so excited about this year. I'm not going to go all "this is my year" on you, don't worry, I'm just super excited. About the new year. Every year. I ate too many Fizzers in the last week. Including today.
Haha.

Anyway...

Welcome to Beauty Tip Tuesday, my new feature, where I get to share some more beauty tips. You're welcome to share your beauty issues and struggles via email or leave a comment below, and I'll try my best to give you some simple tips to make life that little bit easier. :-)

Today's tip is about nails. Well, more specifically, fingers.

We all know that removing our nail polish/finish product, especially if you have gel nails or artificial tips that require soaking off in acetone, can leave the skin around our nails (and our fingertips) dry and sensitive. So next time you remove your nail polish, coat your cuticles and the skin around your nail with vaseline, body butter, cuticle oil, olive oil, lip balm, conditioner or my latest household obsession, coconut oil. Sometimes I'm very impatient when it comes to removing nail polish so I just apply one of the aforementioned mediums to both my hands, as I would hand cream. So because your hands/fingers are wonderfully coated, you don't lose as much moisture from your skin and cuticles. Easy, right?

Try it and let me know how it goes.

Miss B


Follow on Bloglovin